The Battle of Stirling Bridge: Stunning Scottish Victory
Scotland claimed few victories over English forces in medieval times. One of the greatest of Scotland's battlefield triumphs was at Stirling Bridge, in the late 13th Century, and one of the commanders delivering that victory was the famous William Wallace. Scotland in the late 13th Century was a loose confederation of clans, led by nobles who competed amongst themselves to have the most influence. The death of King Alexander III in 1286 had left a considerable void, and no one had yet adequately filled that void. The struggle to succeed Alexander as King of Scotland became known as the Great Cause. The Scottish nobles turned to the neighboring monarch to the south, England's King Edward I, to act as kingmaker. The two most powerful nobles in Scotland at the time were John Balliol and Robert Bruce. Edward chose Balliol to be King of the Scots, and Balliol was so crowned. 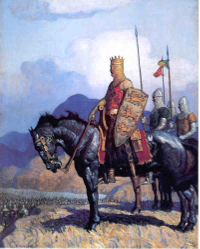
That decision did not sit lightly with the Bruce or his supporters, and dissension simmered. Edward, convinced that the Scottish nobles had appointed him the equivalent of an overlord, made increasingly authoritative demands of Balliol and of Scotland. Edward, fighting against France, demanded that the Scottish nobles provide manpower and money on Edward's behalf. Scotland refused to provide troops for Edward's war against France and, further, entered into an agreement with France that later came to be called the Auld Alliance. Scotland then attacked Carlisle, in northern England. An incensed Edward sent an English army into Scotland, in 1296. In the ensuing struggle, the Scots proved no match for the English and Edward even seized Balliol, sending him as a prison to the Tower of London. Edward became known as the "Hammer of the Scots." He had destroyed Berwick, taken Dunbar, and seized much of the country and its riches, not to mention many of its nobles. Also in that year, Edward seized the Stone of Destiny, on which all Scottish kings had been crowned for time immemorial, and sent it to Westminster Abbey. (He later had it installed underneath his Coronation Chair.) Even with this infusion of Scottish money, Edward didn't have enough to build the sort of castle enforcement that he had used to keep Wales in check, and Scotland took advantage. The Scottish rebels rallied behind the leadership of William Wallace in the south and Andrew Moray in the north, the former more than the latter, and won a series of victories over the English, such that all of Scotland north of the Firth of Forth was again in Scottish hands. The most notable of these Scottish victories was at the Battle of Stirling Bridge, on Sept. 11, 1297. Stirling offered a command position of the Scottish countryside. The road north went through the town, and that same road went across the Forth, by way of a large bridge. Leading the English force on Edward's behalf was John de Warenne, the Earl of Surrey. He had with him a contingent of heavy cavalry and a large force of armed foot soldiers, and he was confident of victory. The English army was much larger than the force that Wallace and Moray had. Estimates are that the English had up to 15,000 (some sources say 50,000) infantry and 3,000 cavalry; the Scottish force may have had nearly similar numbers in infantry but definitely lacked a cavalry contingent worthy of standing up to the vaunted English heavy cavalry and was made up largely of commoners because most of the Scottish nobles had been captured by the English. 
Wallace and Moray had joined forces and were at the River Forth near Stirling in September. They had arrayed the Scots on the high point of Abbey Craig, from which a mile-long causeway stretched to the bridge. To neutralize the English numerical superiority, Wallace placed his army on the other side of a bridge that the English would have to cross in order to attack. The bridge was so narrow that the men could cross only two abreast. The attack that finally came took place after the third English attempt to get its army across the bridge. The army set off originally before Warenne had awakened, and he angrily called them back; the second attempt was forestalled by one last attempt at negotiation, to which the Dominican friars sent to talk to Wallace and Moray were greeted with this from Wallace: "Tell your commander that we are not here to make peace but to do battle, defend ourselves, and liberate our kingdom. Let them come, and we shall prove this in their very beards." 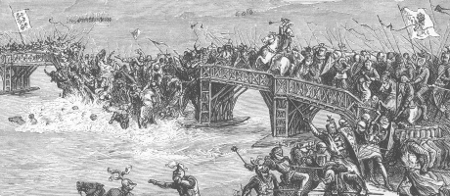
One of the English commanders, the former Scottish knight Richard Lundie, urged that a detachment of cavalry be sent to miles upstream to a ford, where 60 horsemen at a time could cross, so that the cavalry could provide an escort for the crossing of the infantry, the main part of the English force and, if possible, outflank the Scottish forces. Hugh de Cressingham, the king's treasurer and tax collector, convinced Warenne that he had already wasted enough of the king's money, and the deployment across the bridge began. Wallace ordered his forces to wait until about half of the English force was already across and then attacked. One part of the Scottish force engaged the English soldiers who had already crossed the bridge. One of the first English was the overconfident Cressingham, who had led the charge.
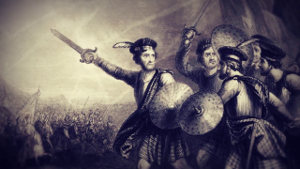
Another Scottish force stormed to the bridge, in order to cut off retreat of Englishmen already across and to prevent any further attacks. The English were trapped, encircled, and killed. One English knight, Sir Marmaduke Thweng, made it back across the bridge; the others were caught up in the fray. Warenne, who had stayed behind, ordered the bridge destroyed, trapping the rest of his army in the teeth of slaughter. Many English soldiers escaped by swimming across the Forth. The English army retreated in shocked defeat. The Scottish army exulted. Wallace declared victory and found himself named Guardian of Scotland. He celebrated by going on a rampage of his own, ravaging hundreds of towns in northern England and daring Edward to send another army to fight him. The one blot on the first major defeat of an English force by a Scottish one in several centuries was the loss of Moray. He was wounded at Stirling Bridge and died two months later. |
|


Social Studies for Kids
copyright 2002–2026
David White